Ms Publisher Used to Upload a Banner Design to Vista Print
I am a Web Marketing Manager, Graphic Designer, Web Programmer, Net Marketing Manager, and Event Lensman.
I have worked in the print advertising manufacture for over nine years now, which includes newspapers, magazines, marketing, and sales fabric as well as banners and car wraps, etc. I also work closely with our in-house printer to correct and pre-flight commercial jobs that come up to our visitor. I
take institute that if you want to build a strong relationship with your printers, you need to do a little research and evangelize a file that is set up to print. This ensures a better print quality as well as time saved on both parties' ends. Understanding the printer's procedure volition ensure a strong relationship besides as loftier quality printed material.
I have found that for modest commercial items, VistaPrint.com is a great company to piece of work with forth with Got Print, Staples, Moo Cards, and of course, local commercial printers.
Once you lot have established a relationship with VistaPrint, you lot tin can easily upload your projects and accept them printed and delivered within the same week. Their prices are very reasonable, still, the way that they tin can practice this is by cutting down on correction processes. They offer several templates that you can work from, and the option to upload your own artwork. To guarantee the all-time toll possible with VistaPrint.com, you lot must ensure that the artwork is uploaded correctly and is impress-gear up.
Paper sizes seem to ever bring confusion, and the lesser line is that verbal measurements make a difference. I have had commercial jobs come up to me, and the clients say, "Well it's off half an inch, merely that won't brand that much of a difference." But the fact is that half an inch could make a huge deviation. The printer will so demand to resize the document to fit, and if it is non proportionate it volition be either stretched or squished to fit. It is extra work for the printer, almost likely a bigger charge for the client in the end, and poor quality in most cases.
There are several projects that different sizes tin can be used for, just I have included a few examples. Below are a few basic paper sizes.
Newspaper Sizes
- Letter Size - 8.5"x11": This is the most common size in the United States used in most commercial communication aids such equally fax machines and copy machines, as well equally being the standard print size for home inkjet printers.
- Legal Size - 8.five"x14": This size is offered on some printers, most likely any printer that is built to handle 8.5"x11" paper can handle this size because the width is the same. This size is used for larger flyers, brochures and works well with Microsoft Excel projects.
- Tabloid Size - 11"x17": Some home printers tin can handle this size, simply you will observe these printers are much larger than other at-abode inkjet printers. This size is great for flyers, brochures, signs, and four-page flyers as well. When you fold the 11"x17" paper in one-half information technology volition create iv 8.five"x11" panels which are dandy for announcements, programs, and small booklets.
- Letter Half Size - five.5"x8.five": This size is the U.s. standard letter of the alphabet size (8.5"x11") cut in half. This is a common size for direct mail pieces and inserts for magazines and booklets. At that place are several sizes for direct postal service pieces, so you volition need to cheque with your printer to observe out the sizes that they offer.
- A4 - viii.2677"x11.6929": This is the common "letter" size outside of North America, primarily used in Europe.
- A3 - xi.6929"x16.5354": This is a size used outside of N America, and is usually used when you want to output two A4 documents on the aforementioned spread.
- Compact Disc - 4.7222"x4.75": This size is specific for CD covers and inserts.
Other Sizes
Postcards:
- Standard: 5.47x4.21
- Oversized: 8.5x5.47
Business organization Cards:
- No Bleed Horizontal: 3.43" x 1.93"
- No Bleed Vertical: 1.93"x3.43"
- Bleed Horizontal: 3.54" x 2.05"
- Drain Vertical: 2.05" x 3.54"
Posters:
- Small: 11.25"x17.three"
- Medium: xviii"x24"
- Big: 24"x36"
Notes: Sizes are from Vista Print.
What Is a Bleed?
At that place a few other topics that go hand-in-hand with document size, such as the bleed. A drain is primarily used for flyers, magazine covers, advertisements, and mailing pieces. A bleed is when your terminal printed price does not accept a border around the paradigm; it goes correct to the edge of the paper.
Yous can attain this by giving extra room to the printer to exist able to trim backlog paper that doesn't contain pertinent data.
Primarily, a standard bleed in the United states of america is .125", pregnant if your folio size was viii.5"x11" you lot would and so add .125" to each side. The final product size would still be 8.5"x11", but your image would go right to the edge of the paper. This likewise ways that it is of import that y'all go out a margin to ensure that nothing important is cut off or cropped too close to the border of the piece.
Why Are Margins Important?
A margin is a space that you get out in between the final trim expanse and the paradigm size area. This space ensures that later on the product is trimmed, the content is not cut off or also shut to the outer edges. A standard size margin is .25" on all four sides of the certificate. The margin space will print, unlike the drain, so make sure that the data that is contained in the margin is something that you want to be included.
Whorl to Go along
To create a certificate in Adobe InDesign that includes a bleed and a margin follow the beneath instructions.
- Get to "File" -> "New" -> "Document"
- You will exist prompted with a screen that will ask you for more data:
- Prepare your margins to .25" (y'all can type it in equally ".25in" and it will automatically convert to picas for yous) and select the link tool in the middle of the iv margin options. This volition make all four margins the same size all the way around the certificate.
- Set your bleed to be .125", over again (y'all tin type it in as ".125in" and it will automatically convert to picas for you). Select the link tool on the far right and it will make the bleed all the fashion around the document the same.
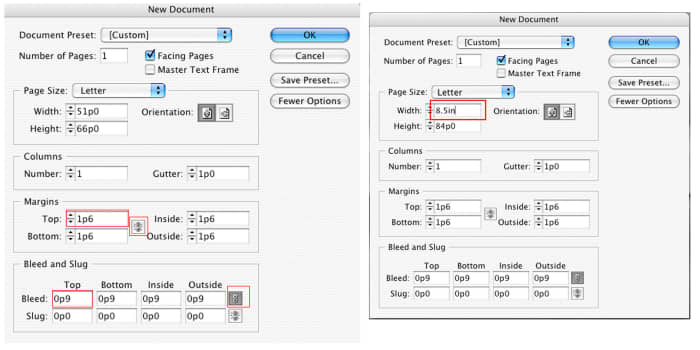
(y'all can type it in as .125in and it will automatically convert to picas for yous).

Bleed, Margin and Image Areas are ready upwards.
Y'all will end up with a certificate that shows a bleed area: This is the area that the printer volition trim to after the impress the document. It will prove your margin, the expanse where you want to take pieces print, but want to go on text out of when designing. And information technology shows the image surface area: The area where all of your important information and images can be displayed.
There are few other options in the document setup prompt that although they are not necessarily needed, they tin be very helpful in a variety of projects. For case, setting up a 3-panel tri-fold brochure can be very piece of cake when using your document setup options.
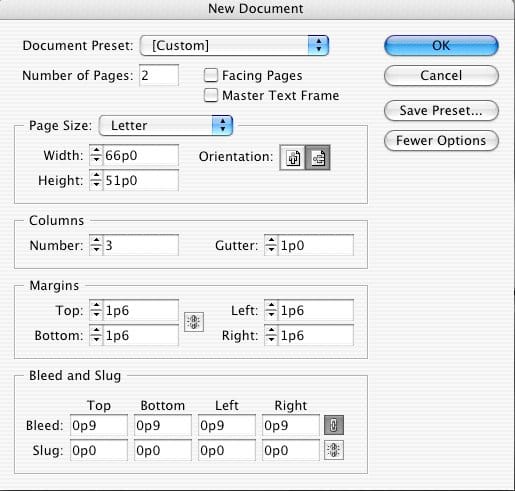
Document settings for a Tri-Fold Brochure in Adobe InDesign.
How to Set up a Iii-Panel Tri-Fold Brochure
- Go to "File" -> "New" -> "Certificate"
- You will exist prompted with a screen that will ask you for more data:
- Cull "2" pages in the "number of pages"; y'all volition need 2 because the brochure is folded utilizing both sides.
- Choose "letter" for the folio size.
- Choose landscape as the orientation (the prototype to the right of page size that shows the symbol of a person sideways)
- Under "Columns" cull "iii" – this will give you lot the three panels.
- In the "Gutter" option go far ". 01667in", which volition automatically convert to 1p0 picas. This is the area between the panels where the brochure will exist folded.
- Set your margins to .25" (you lot can type it in equally ". 25in" and it volition automatically convert to picas for you lot) and select the link tool in the heart of the four margin options. This will make all four margins the same size.
- Set your bleed to exist .125", over again (you can type it in every bit ". 125in" and it will automatically catechumen to picas for you). Select the link tool on the far right and it volition make the bleed all the fashion around the document the aforementioned.
- Select "OK" and you will end up with a document with two pages similar the below images.

Tri-Fold Brochure settings with Bleed, Margin and Image area.
When you lot design for the brochure, you demand to remember that yous demand to pay attention to how the production is folded. Below is the layout of the panels for a alphabetic character-size tri-fold brochure.
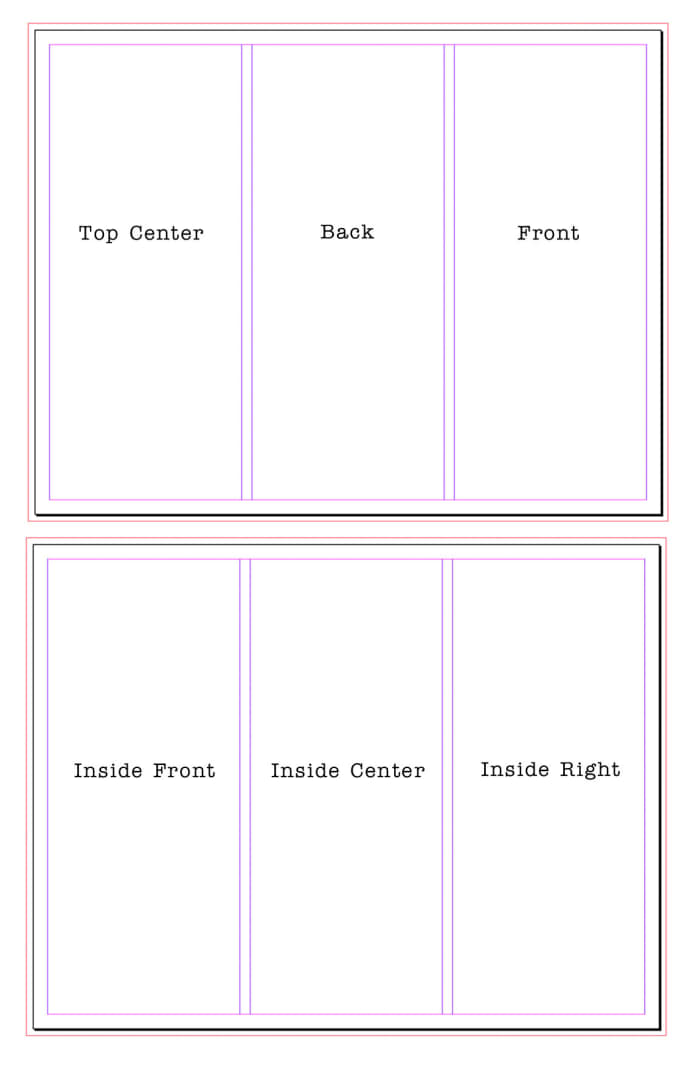
Tri-Fold Brochure console layout.
Final Reminders
The best way to ensure a strong relationship with your printer is to understand what they need and deliver that in the terminal production. This includes big commercial printers such every bit Trumbull Printing and HH Printing in addition to smaller projection commercial printers such as VistaPrint and GotPrint.
The three primary components of document set up are the document size, the bleed, and the margin. This understanding not only volition encourage a great relationship with your printer but volition as well guarantee the best possible print quality for your design client.
This article is accurate and true to the best of the author's cognition. Content is for informational or entertainment purposes simply and does non substitute for personal counsel or professional communication in business concern, financial, legal, or technical matters.
© 2011 dappledesigns
chum cole on May 20, 2019:
hai! this site is very helpful and useful.
thanks for sharing this..
God anoint
MD Zahid Hasan on Baronial 08, 2018:
Thanks for your data mam
Daphne on Nov 27, 2017:
Amazing article! Thanks :)
I would like to print a small-scale notebook (something like 90mm 10 160mm).
Should I gear up each page as per dimension to exist printed out or could I divide the folio in 3 to save newspaper/price? Each folio could exist e.m. 1/3 of an A4 size.
How should I fix the bleed in this case?
Exercise any of these companies y'all mentioned practise this kind of piece of work?
Joshua Harrell on May 09, 2015:
Very useful article, cheers! Yet, I still tin can't wrap my encephalon effectually trim marks vs. actual page size as Not being one of the same. I use an older CS3 version of Illustrator, and when I check the trim marks, it just makes them aligned with the exterior of the page size which makes them the same - first adjustment only makes the outside margins bigger for printer marks, etc.
However, I have had various jobs that spec them out differently:
Dimensions: 291mm x 188mm
Trim: 255m x 170mm
Does this mean the page size with drain is 291mm x 188mm and the actual page size is 255 x 170 thus making the trim marks the same at 255x170? Only other thing I can think of is to make the page size 291mm x 188mm and manually create the trim marks at Trim: 255m x 170mm.
Thank in Advance!!!
mslassy on Dec 01, 2014:
I should have added that I can save the pdf as a 6x9 already. Not certain if that is helpful.
mslassy on December 01, 2014:
Thanks for your response! I'm going to use Blurb. Unless you have another site that you recommend that might be meliorate? I purchased a recipe/cook program chosen DVO (dvo.com) and it creates a cookbook and and then information technology allows me to print the recipes as a cookbook past saving it equally a PDF.
dappledesigns (author) from In Limbo between New England and the Midwest on December 01, 2014:
I'm so happy to hear that y'all find this page useful! Some sites will automatically build in your drain lines while others will non allow a drain at all. Do you listen sharing the site that you lot are using?
If you are uploading a concluding PDF, and they do not require bleed marks, you can just add together .125" on each side of the document. This volition exist the part that the printer cuts off then that the prototype goes right to the edge of the printed piece. Then, from the final trim size of 6x9, practice an inset margin line of .25" from each side. everything that is within the the final margin box is 'safe' from being chopped off.
Do yous mind telling me what plan you lot are using on your mac? I may be able to amend aid if I accept that info.
mslassy on November 29, 2014:
Hullo... I found your page almost helpful. I'1000 completely useless when it comes to this sort of affair. I'k trying to print a family cookbook through a website. It's a 'trade book' 6x9 and it'due south 220 pages. I don't empathize the bleed and safety lines??? I'1000 saving my cookbook to PDF and uploading to the site. I have the power to set the margins in my plan (top, bottom, left, right). That's it. And I accept a MAC if that matters. Tin you tell me what the margins should be set at? Give thanks you SOOOOO much!
dappledesigns (author) from In Limbo between New England and the Midwest on January 20, 2014:
Hi Bonnie - is information technology a bare gap or it part of the next page? If you are seeing a part of the next page that is completely normal and something that the printer needs to fix the image.
If it is a large gap in the one page be certain that you document is set with the bleeds and margins correctly in the document preferences. From there using "document drain settings" when PDFing should work for you.
bonnie on January 18, 2014:
I have a question about bleeds and margins. I gear up everything to the correct measurements for a viii.5x11 half booklet. And with some full page bleeds. The problems I've been seeing are that in the last stride. After exporting and and then printing I am getting this huge one/2 blank gap on ane side of the folio. I've tried variations and reset and tried unlike settings both indesign settings, print booklet settings, export settings, and even acrobat settings. Where is this problem occurring. I dont know if its coming from indesign or acrobat. The layout seems fine indesign merely I think maybe its the process from indesign to pdf? delight aid!
dappledesigns (writer) from In Limbo between New England and the Midwest on December 12, 2013:
I am happy to hear this.
dappledesigns (writer) from In Limbo betwixt New England and the Midwest on December 12, 2013:
give thanks yous! I'm glad you found information technology a practiced read.
dappledesigns (author) from In Limbo betwixt New England and the Midwest on December 12, 2013:
How-do-you-do Raymond,
The bleed and trim will remain the aforementioned considering those marks are for the printer to trim the paper. Then your paradigm epitome size would exist the 2.75in x 2.25 in with a .25 margin (space within your final image size) and so an boosted .125" on all four sides which the printer will use to create the bleed page. The drain will be cut off completely and the margin expanse allows for text to float and not be cut off in the procedure of paradigm setting.
Raymond on Dec 12, 2013:
Howdy,my i ask how to determine a reasonable margin and bleeding size acoording to the certificate print,like if i need to make a small magazine
virtually (2.75 x2.25 inch)
dappledesigns (author) from In Limbo between New England and the Midwest on June ten, 2013:
Howdy Ingeniousdesign
I would recommend shaving of one/eight" for the inside folded page. It will not be likewise drastic but will allow for the fold to lay flat when condensed.
ingeniousdesign on May 03, 2013:
Hello Dappledesigns, I got a question, that I can't seem to discover the answer on google (well mayhap non on the first 5 search pages). If we brand a trifold brochure which is not a Z-fold, how much length do you reckon nosotros should cutting from the folio/side that's got tucked in?
dappledesigns (writer) from In Limbo between New England and the Midwest on April xiii, 2013:
I am and so glad this hub was helpful.
@crookedcreekphoto - I was lucky enough to work closely with our in-house printer and learn what was helpful and what drove them nuts :) Definitely a valuable learning experience that I have taken with me on each project I piece of work on.
crookedcreekphoto from Ohio, Usa on August 10, 2012:
I have been in the press industry for over twenty years (mainly in the pre-press department likewise as running digital printers) and your hub was spot on. Nil frustrates a technician more than when a "graphic designer" doesn't understand the printing process at all. Schools teach them the design process but simply equally of import is the product part of it.
G3 Artistic Solutions from Glasgow, Scotland on August 08, 2012:
Well crafted hub - cheers.
Anjo Bacarisas Ii from Cagayan de Oro, Philippines on Baronial 07, 2012:
This was a very interesting folio, the idea and idea was indeed very intriguing! Thanks for sharing this info!
sanjay on July 26, 2012:
very helpful.
dappledesigns (author) from In Limbo between New England and the Midwest on Apr xx, 2012:
Not Usually Disgruntled - I am sorry to hear that you had a bad experience with one of the companies that I listed in my article. I hope that it gets resolved for y'all chop-chop.
AMIEPYE on February 17, 2012:
Thank you!
divya on Feb xiv, 2012:
Amazing article !
dappledesigns (author) from In Limbo between New England and the Midwest on June 15, 2011:
Thank you. VistaPrint does have a dainty fix for exact template measurements, and their prices are very reasonable.
jacqui2011 from Norfolk, UK on June 15, 2011:
Useful hub. I have used Vistaprint in the past mainly for flyers and business cards. Their templates choice is dandy and service is quick.
Source: https://turbofuture.com/graphic-design-video/Graphic-Design-Pre-Press-Paper-Sizes-Bleeds-Margins-and-Final-Trim
Postar um comentário for "Ms Publisher Used to Upload a Banner Design to Vista Print"